This is the second article in a series focusing on deploying TheHive and Cortex AMIs on AWS. We are publishing these tutorials alongside our AMI user guides to better illustrate what real-life deployments look like.
In part 1, we covered the reference SecOps VPC architecture used as the target environment in which we will launch our TheHive and Cortex instances.
In part 2, we will launch TheHive and Cortex instances in our freshly built SecOps VPC automatically using Terraform. You should also be able to use your preexisting VPC by tweaking a few variables so long as you run a similar architecture. Otherwise, our sample code can be fairly easily customized as it is documented both inline and in the user guides.
Deploying TheHive and Cortex — overview
Now that our VPC is up and running (or if you already had a VPC of your own in the first place), we can proceed with the actual TheHive and Cortex deployments.
Since we will expect TheHive to connect to Cortex, we will start by launching the Cortex instance. We will be deploying both instances with empty databases.
We plan on publishing an instance upgrade / replacement tutorial in this article series at a later time but you can already find detailed upgrade instructions in the AMI user guides.
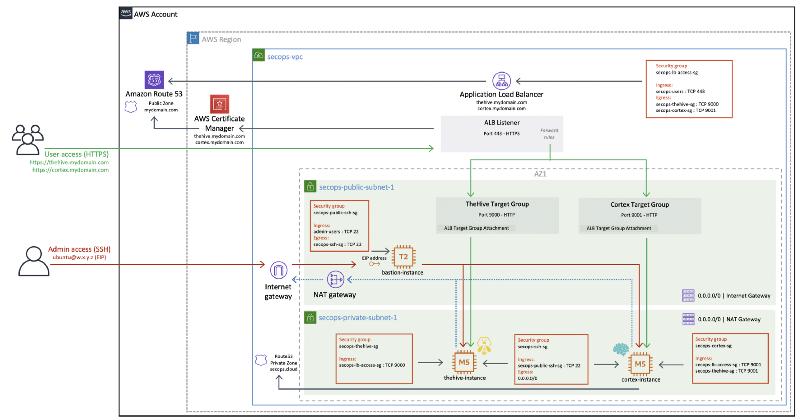
Once our instances are deployed, this is what our VPC will look like:
The SecOps VPC with TheHive and Cortex
Cortex — customizing Terraform variables
You will need to customize a few Terraform variables before you can deploy Cortex. Go to the ug-secops-cortex-new folder and set the following variables in the terraform.tfvars file:
secops_iam_profile –> AWS credentials profile namesecops_key_pair_name –> Name of a new keypair that will be created to connect to the Cortex instance (keypair names must be unique – do not use the same name as the one used for the bastion host)secops_key_pair_public_key –> Your public key to associate with the new keypair
Set the other variables as well if you did not use the default values when creating the VPC or if you are deploying on a preexisting VPC.
Cortex — Terraform deployment
You are all set to launch your Cortex instance, you can now:
terraform init if you have not yet initialized your Terraform environment (you have to do this in each Terraform folder)terraform plan to get an overview of the resources that will be createdterraform apply to proceed with the Cortex deployment
Note: Cortex product page on the AWS Marketplace
Your Cortex instance is now awaiting at https://[secops_r53_cortex_record variable value]
Notes:
- Remember to whitelist your local public IP address in the users security group we created with the VPC.
- Since the ALB is doing the routing to our new instance, we need to wait for the ALB to identify this instance as a healthy target. This can take a minute or two once Terraform is done provisioning the instance.
As we launched a brand new Cortex instance with an empty database, we now need to create:
- a Cortex administrator,
- a Cortex organization and
- an organization user (with an API key to connect from TheHive)
Follow the Cortex Quick Start guide for detailed instructions on how to do this. Start at step 2 (Update the Database) since Cortex is already set up and running.
TheHive — customizing Terraform variables
Now that we are done with Cortex, we can deploy TheHive. Just as you did with the VPC and Cortex, you will need to customize a few Terraform variables before you can deploy TheHive. Go to the ug-secops-thehive-new folder and set the following variables in the terraform.tfvars file:
secops_iam_profile –> AWS credentials profile namesecops_key_pair_name –> Name of a new keypair that will be created to connect to the TheHive instance (keypair names must be unique – do not use the same name as the one used for the bastion host or Cortex)secops_key_pair_public_key –> Your public key to associate with the new keypair
Again, set the other variables as well if you did not use the default values when creating the VPC or if you are deploying on a preexisting VPC.
TheHive — Terraform deployment
You are all set to launch your TheHive instance, you can now:
terraform init if you have not yet initialized your Terraform environment (you have to do this in each Terraform folder)terraform plan to get an overview of the resources that will be createdterraform apply to proceed with the TheHive deployment
Note: TheHive product page on the AWS Marketplace
Your TheHive instance is now awaiting at https://[secops_r53_thehive_record variable value]
Notes:
- Remember to whitelist your local public IP address in the users security group we created with the VPC.
- Since the ALB is doing the routing to our new instance, we need to wait for the ALB to identify this instance as a healthy target. This can take a minute or two once Terraform is done provisioning the instance.
As we launched a brand new TheHive instance with an empty database, we now need to:
- create a TheHive administrator
- configure the Cortex integration
The administrator account creation process is very similar to Cortex: just connect to your instance using a web browser, click on Update Database and create the first administrator account.
Configuring Cortex integration will require we SSH into the TheHive instance.
TheHive and Cortex — SSH into the instances
Since our TheHive and Cortex instances are located in a private subnet, we cannot directly SSH into them using their private IP addresses. We can still seamlessly connect to private instances using the proxyjump functionality of the ssh client.
The easiest way to do that is to create (or update) the ~/.ssh/config file on your local computer. Use the example below as a reference. Replace the bastion host public ip address (the IP address we got when creating the VPC in part 1) and your private key information. If you did not use the default private DNS zone name, customize the hostnames for TheHive and Cortex as well.
Host bastion HostName 1.2.3.4 User ubuntu Port 22 IdentityFile ~/.ssh/id_rsa_private_key_for_bastionHost thehive HostName thehive.secops.cloud User ubuntu Port 22 ProxyJump bastion IdentityFile ~/.ssh/id_rsa_private_key_for_thehiveHost cortex HostName cortex.secops.cloud User ubuntu Port 22 ProxyJump bastion IdentityFile ~/.ssh/id_rsa_private_key_for_cortex
We use the secops.cloud domain as an example but the best security practice is to use a domain name you own even for private DNS resolution in split-horizon.
You will now be able to SSH into the TheHive and Cortex instances directly using the bastion host as a proxy:
ssh thehive ssh cortex
Note: Remember to whitelist your local public IP address in the bastion security group we created with the VPC.
Configuring Cortex integration in TheHive
SSH into your TheHive instance and refer to section 6 of the TheHive configuration guide for detailed instructions on configuring Cortex integration.
Here is a quick version:
- update the configuration file located at
/etc/thehive/application.conf
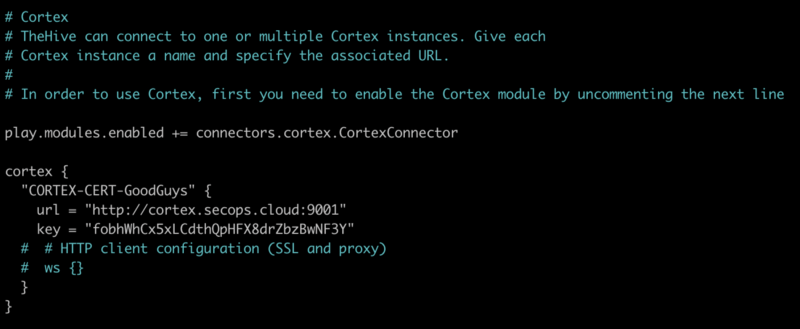
- enable (uncomment) the Cortex configuration section and set the Cortex URL and API key
- in our example, TheHive can find Cortex at
url = "http://cortex.secops.cloud:9001"
- use the API key you created in part 3a while initializing Cortex (or go create one now if you have not done so already)
- save the configuration file and restart the
thehive service
A sample Cortex integration in a TheHive application configuration file
You should avoid pointing to the Cortex private IP address since it will change every time you destroy and recreate the instance, which, again, is our recommended upgrade method. The configuration file will be automatically backed up daily and will be restored when you launch a new TheHive instance with existing data. This way, you can update either TheHive, Cortex or both anytime without breaking the integration between them.
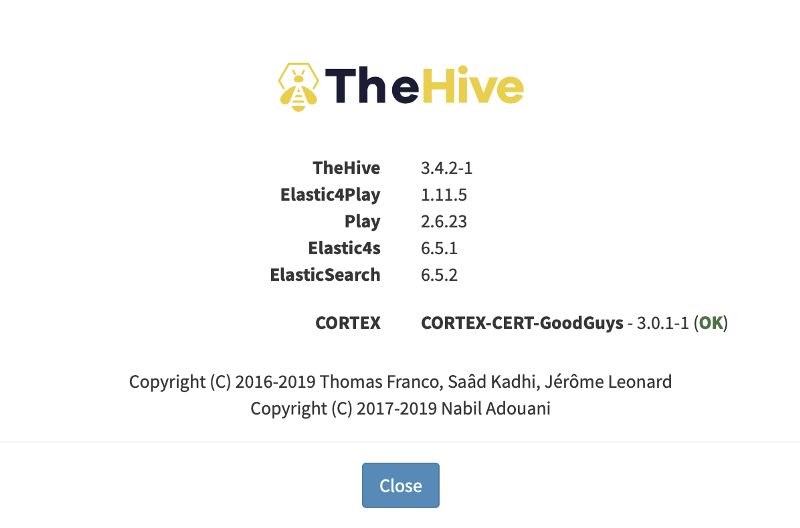
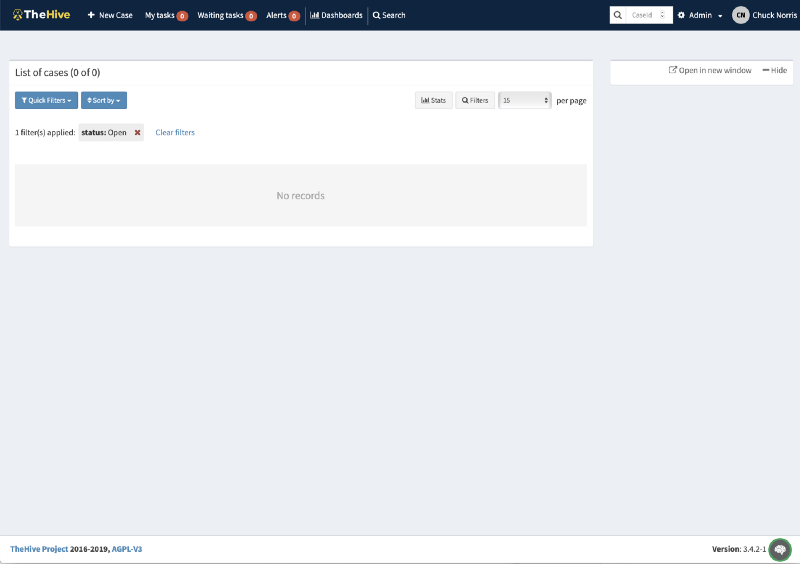
You should now see the Cortex integration in the About page or in the lower right corner.
Cortex integration as seen in the About page
Cortex integration as seen in the lower right corner of TheHive
That’s it! Both TheHive and Cortex are set up to work hand in hand to fight the good fights.
Should you wish to cleanly destroy everything we created, you can simply run the terraform destroy command from each Terraform folder. Wait for TheHive and Cortex to be fully destroyed before destroying the VPC.
Note that EBS data volumes for TheHive and Cortex will not be destroyed along as they are flagged to be persistent. Please refer to the AMI user guides for more information on how we implemented EBS data volumes.
Any thoughts or questions?
We look forward to your feedback on this tutorial and on the AMI distributions of TheHive and Cortex.